|
Action Step: Setup your Shopping Cart. If you sell multiple products on the net and want your customers to be able to order more than 1 product at a time, this is a necessary step.
|

|
Action: Setup Your Shopping Cart If you sell multiple products you'll need to set up a shopping cart so your customers can order more than one of your products at a time. Click here to activate a 30 day free trial of the Ultimate Automation software. Here's how easy it is to set up your shopping cart:
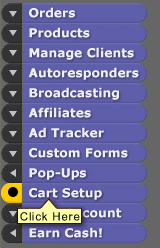
Once you've logged into your free trial account just click "CART SETUP" on the left hand side navigation bar. You can see exactly where in this screen capture:
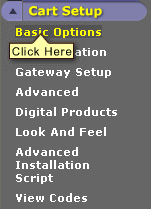
The navigation panel will expand downwards so you need to click "BASIC OPTIONS":
That opens the options on the right. The same occurs for each of the options you choose from the left hand nav bar. When you click one of them, the corresponding information opens on the right.
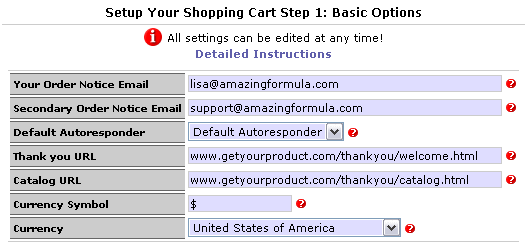
In our example we're adding our basic cart options:
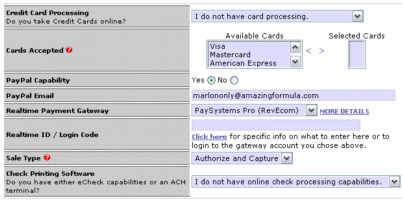
Here they are explained a bit more in detail: Order Notice Email – When you get a new order, the system sends an email receipt with all the order info except the payment information. If your ISP/email host rejects the order notice for any reason, you may not know about an order until the customer complains! Therefore, it may be a good idea to enter a Secondary Order Notice address and check your orders on a daily basis. The system will send out notification emails to both addresses. If you’re using a fulfillment house or similar service, you could also enter that email address here. Default Autoresponder (Autoresponder, Basic, or Professional Package only) – This is the Autoresponder series that you would like all new customers to receive. You can also set Autoresponders for each product individually. Thank You URL – This is the page that customers are taken to when their approved order is complete. By default, this field has the URL for a page that Automate Your Website generates automatically. We highly recommend you create your own Purchase Thank You page and enter the URL here. Catalog URL – This is the default URL for the “Catalog” area on your website. This is where the customer is taken by default when they click “Continue Shopping” or when they clear the Shopping Cart or Cancel their order. If this is blank, the system defaults to your main website URL entered in your Profile Info. (also see Destination URLs and Upsells in More Cart Features). Currency Symbol – Automate Your Website supports the use of any currency in the world, but you can accept only one currency per Shopping Cart account. Enter the symbol you use here, and all the prices on pages generated by Automate Your Website will have that symbol to the left. Any character or combination of characters is valid: $, ¥, £, US$, AU$, etc.
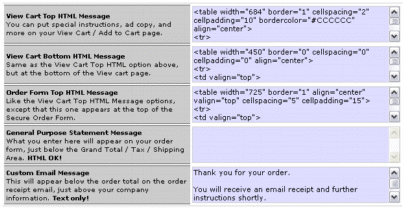
When you're done with the basic options, go back to the nav bar on the left and choose "Customization". Here you can configure the way your cart looks by adding some optional HTML code. If you don't know much about HTML you can completely skip this step and use the default data.
Here are the 5 options explained in detail; View Cart Top HTML – This option may be composed in HTML and will be displayed underneath the company name or logo in the "cart view". View Cart Bottom HTML – This message may also be composed in HTML and will appear at the bottom of the cart view. Order Form Top HTML Message – This is a message that will appear at the top of your secure Order Form, just below your company name. This can include basic HTML as well, such as <center>,<b>,<h1-h7>, <table>, <ul> and so on. Just make sure your HTML is formatted well, unclosed tags and such may cause errors on the rest of the order form. This is a great place to tell your customers how to make a phone or mail-in order, or outline any purchase-related policies, etc. General Purpose Statement – Exactly like the Order Form Top HTML Message, but this one appears just below the Grand Total and Sales Tax on the Order Form. This is often used to inform customers of your shipping, sales tax, or minimum order policies. HTML is valid here also. Custom Email Message – “Returns accepted up to 30 days after shipping date” or other custom messages can appear in the receipt email customers get immediately after submitting a successful order.
Here you can enter your Payment Gateway.
For example, if you've signed up with PayPal, you just enter your PayPal email address into the form field. In our example we've selected PayPal as our payment gateway. Please Note: Some of the 3rd party payment processors do come and go. I remember using PaySystems.com (formerly Revecom.com) for quite some time then without much notice at all, they informed me they were moving to providing only full blown merchant accounts, so I moved all my products back to PayPal as a result. It's my understanding that they are no longer functioning in the same capacity as they were, due to too high of chargebacks from Visa or something else similar. Using more than one processor means now we can accept orders from one or both of those merchants. All you do is enter your merchant ID into the form fields to finish this section. At this point you've set up the shopping cart with the basic minimum of information. If you want to take it one step further and set up your digital product delivery, integrate your associate program and more just click the ADVANCED button on the left hand navigation bar. But the steps above cover everything you need to have your shopping cart ready to take orders for you!
|